How To Guide
Adjusting Spring Tension
How to fix Spring Roller Shades, Adjusting Spring Tension on Cordless Rollers
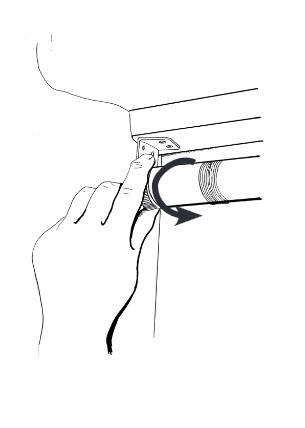
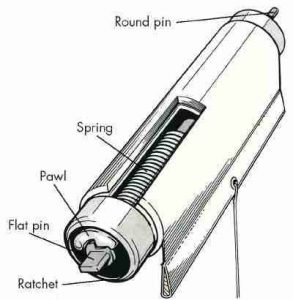
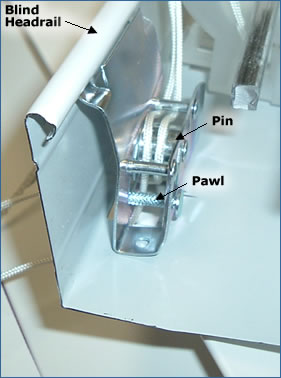
Most of today’s cordless and corded roller window coverings operate by a hollow tube with a coiled spring inside, hence the name “spring roller shade.” The size and material of the tube may vary, but it’s typically made of aluminum. One one end of the tube, there’s a free-turning pin that mounts into the bracket, and on the other end is a ratchet and pin that hold the tension on the spring.
Pulling down on the roller increases the tension on the spring so the shade stays in place. Occasionally, the spring may uncoil and lose tension, so it doesn’t work right.
If the roller’s too loose, here’s how to tighten the spring tension:
- Pull the treatment down approximately halfway.
- Remove the roller from the brackets.
- Roll up the treatment by hand, being careful to roll the shade evenly on the tube.
- Replace the roller in the brackets.
- Repeat if necessary until you have the right amount of tension.
If the shade’s too tight, here’s how to loosen the spring tension:
- Roll up the treatment.
- Remove the roller from the brackets.
- Unroll the treatment approximately halfway by hand.
- Replace the roller in the brackets.
- Repeat if necessary until you have the right amount of tension.
How to adjust a fully uncoiled spring:
- Remove the roller from the brackets.
- Unroll the treatment halfway.
- Use pliers to turn the pin on the spring side of the shade until you feel tension, then back off so the pawl (the latch that allows movement in only one direction) hooks onto the ratchet.
- Loosen or tighten spring tension as necessary using the instructions above.
How to release a spring that is locked in the coil:
- Remove the roller from the brackets.
- Use pliers to grip the pin and twist it clockwise to free the pawl. Release it quickly to unwind the coil.
- Loosen or tighten the spring tension as necessary using the instructions above.
Adjusting String Ladders
How to Adjust String Ladders on Window Blinds
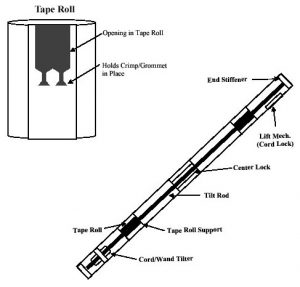
- A metal crimp/grommet is attached to the top of the string ladders on window blinds. This metal crimp/grommet is inserted into the opening on the top of the tape roll. This opening narrows to hold the crimp/grommet securely in place.
- To release the ladder from the tape roll, move the crimp/grommet to the wider opening and remove.
- The crimp/grommet can then be moved or you can adjust the position by tying a knot in the blind ladder. Additional crimps/grommets are available and can also be used to adjust the position.
- Insert the crimp/grommet or knot into the opening on the top of the tape roll and move to the narrow opening to secure in place.
Aligning Vertical Louvers
How to Align Vertical Louvers
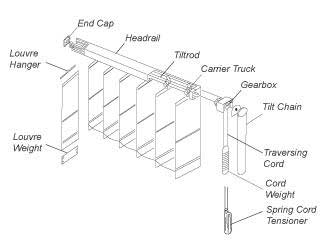
Sometimes vertical louvers can become out of alignment on your vertical blinds, a situation that causes the louvers to not close properly. When this happens, it is very simple to realign the louvers.
- Take hold of the chain and pull to turn louvers to a closed position. By being out of alignment, some louvers will not seem to close as tightly as others. That’s okay, you are getting ready to remedy this.
- Pull louvers to a closed position until the chain stops. Give the chain a good steady tug. It will sound as if you are stripping the gears.
- Pull the chain to turn the louvers in the opposite direction and repeat the act of giving the chain a good steady tug. Again it will sound as the gears are being stripped.
The louvers are now aligned and the blinds will close properly.
If at any time the blind louvers become unaligned, you may repeat the process.
How to Measure
How to Measure for Windows Correctly for Blinds and Shades
Important Note: Do not measure your existing blinds or shades – measure only the window openings to get the correct fit.
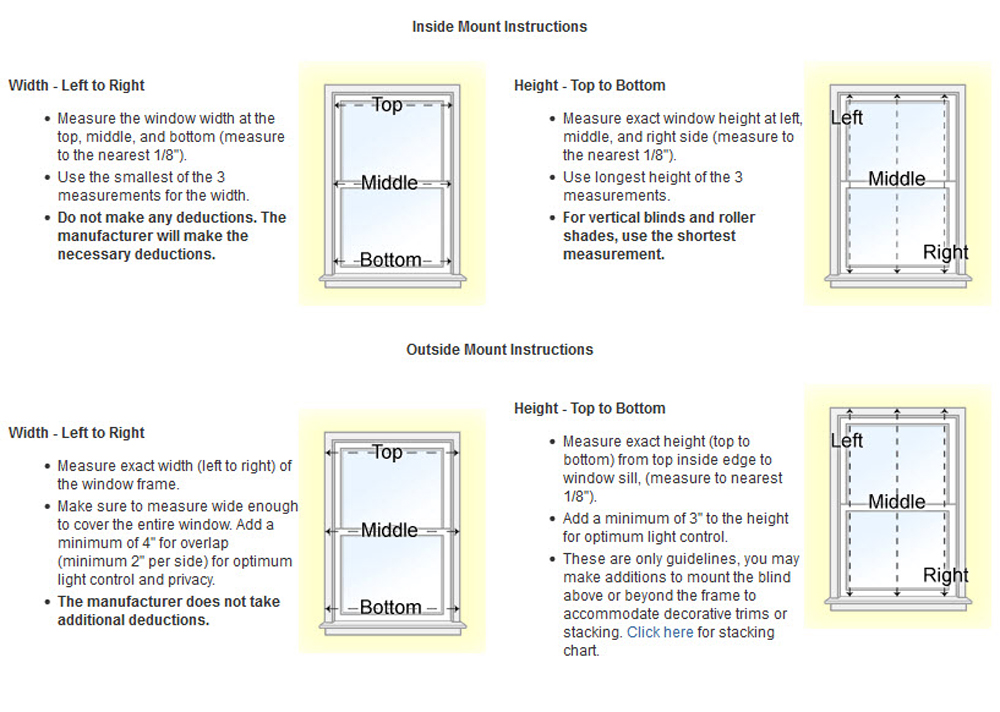
INSIDE MOUNT
Measuring Width:
- Measure the exact width (left to right) of the inside edge of the window frame in 3 places (top, middle, and bottom).
- Make all measurements to the nearest 1/8th inch, round DOWN for width.
- Take the Smallest of the 3 measurements, this is the width that you will order.
- Production department will make the necessary deductions to ensure the blind/shade fits inside your window.
Measuring Height:
- Measure the exact height (top to bottom) from the top inside edge down to the window sill in 3 places.
- Make all measurements to the nearest 1/8th inch, round UP for height.
- Take the LARGEST of the 3 measurements, this is the height that you will order.
Outside Mount
Measuring Width:
- Measure the exact width (left to right) of the window frame or how wide you would like the blind to be.
- Be sure to measure wide enough to cover the entire window and provide maximum light coverage.
- Example: If the window opening is 36” wide, it might be helpful to order 40” if the space allows. This will provide 2” coverage on each side of the window.
- No deductions/additions will be made to the width ordered.
Measuring Height:
- Measure the height you would like the blind to be by measuring top to bottom.
- Be sure to measure high enough to cover the entire window and provide maximum light coverage.
- Example: If the window opening is 60” high, it might be helpful to order 64” if the space allows. This will provide 2” coverage on top and bottom of the window.
- No deductions/additions will be made to the height ordered.

Multiple Blinds One Window
Measuring For Multiple Blinds In One Window
Covering large windows can be a challenge. Sometimes windows are too large for one individual window blind, and hanging two blinds on the same or shared headrail is too much.
Try covering your window with two (or three) blinds. When you hang multiple blinds in the same window, each blind has its own headrail and is installed separately, so you can operate them individually.
Here’s how to measure for two or more separate blinds in one window.
For inside mounted wood, faux wood and mini blinds (Note: Factory deductions as shown below are taken on inside mounted treatments only. When hanging multiple outside mounted blinds, follow the same steps, but do not allow for any deductions; just measure and divide by the number of blinds.):
- Measure the window in three places (top, middle, bottom), as shown in our measuring instructions.
- For two (2) separate blinds in one window, take the smallest width and divide it by 2. Then add 1/4″ to the width of each blind. (The factory will deduct 1/2″ from each blind.)
Example:
If your window measures 80″ wide, calculate the width of each blind as follows:
80″ ÷ 2 = 40″Then add 1/4″ to the width of each blind:
Blind 1 total width: 40″ + ¼”= 40 ¼”
Blind 2 total width: 40″ + ¼”= 40 ¼” - For three (3) blinds in one window, repeat the same steps.
Example:
If your window measures 90” wide, calculate the width of each blind as follows:
90″ ÷ 3 = 30”Then add 1/4″ to the width of the left and right blind. Do not add anything to the width of the middle blind:
Left blind total width: 30” + ¼”= 30 ¼”
Middle blind total width: 30”
Right blind total width: 30” + ¼”= 30 ¼”
For inside mounted honeycomb shades (Note: Factory deductions as shown below are taken on inside mounted treatments only. When hanging multiple outside mounted blinds, follow the same steps below, but do not allow for any deductions; just measure and divide by the number of blinds.):
- Measure the window in three places (top, middle, bottom), as shown in our measuring instructions.
- For two (2) separate blinds in one window, take the smallest width and divide it by 2. (The factory will deduct 1/8″ – 1/4″ from each blind.)
Example:
If your window measures 80″ wide, calculate the width of each blind as follows:
80″ ÷ 2 = 40″ . This is what you will order - For three (3) blinds in one window, repeat the same steps.
Example:
If your window measures 90” wide, calculate the width of each blind as follows:
90″ ÷ 3 = 30”Then add 1/8” to the width of the left and right blind. Do not add anything to the width of the middle blind:
Left blind total width: 30” + ⅛” = 30 ⅛”
Middle blind total width: 30”
Right blind total width: 30” + ⅛”= 30 ⅛”
Route Holes
Measuring route holes for replacement blind slats
- From the left to right, measure from the end of the slat to the center of the 1st hole.
- Then measure from the left end of the slat to the center of 2nd hole.
- Repeat this step for all the routed holes on the slat.
- For routless blinds, measure the same way to the center of the notch on the slat.
How To Install Cord Cleats
Installing Cord Cleats
The final and most important step when installing your window blinds and shades is installing the cord cleat. Cord cleats allow you to wrap any excess cord out of the reach of children, but it still maintains the window covering’s functionality. This essential step will keep your home a safe environment for your children and your pets.
What You’ll Need:
- 2 cord cleats
- 2 screws
- Drill
- Pencil
STEP 1. Mark installation spot with the pencil for the lowest cord cleat. This should be out of reach of children. Take into account that children can climb onto furniture to reach it.
STEP 2. Measure 6 to 12 inches above that initial mark. Make an additional mark with your pencil. This is where the top cord cleat will be installed.
STEP 3. Take one cord cleat and one screw and use your drill to secure the lowest cord cleat on the lowest pencil mark.
STEP 4. Do the same for the last cord cleat, screw, and pencil mark.
STEP 5. Raise your blinds or shades and wrap the excess cord tightly around the two cord cleats, either in a loop or figure 8 formations.
NOTE: The potential hazard of dangling cords isn’t worth risking the health and well-being of your children or pets.

How To Install Cord Tensioners
Installing Cord Tensioners
Cord tensioners are attached to all continuous cord loop lift systems. All you have to do is install it. Because of the danger unsecured loop cords pose to small children, installing the cord tensioner is a necessary step to installing your window coverings. Ensure the safety of your children in four simple steps.
What You’ll Need:
- Tensioner (Already attached to cord loop)
- Screw
- Drill
STEP 1. Pull the cord as tight as you can toward the windowsill without damaging or straining the window coverings.
STEP 2. Place screw through hole.
STEP 3. Drill in the screw until the cord tensioner is securely fastened to the wall or window frame.
STEP 4. Check the tension in the loop or chain. It should be taut. Recheck the cord tensioner for stability.
How To Install For Narrow Blinds
Installing Horizontal Blinds that are Too Narrow
Occasionally blinds are measured incorrectly and they are not wide enough for your window. Manufacturers will typically deduct approximately 1/2″ from the specified measurement for proper clearance. If you have ordered blinds that are too narrow sometimes you can still mount them by installing them as a ceiling mount to the top of the window sill. Installation will be similar to an outside mount. You will need the following tools:
- A hand, electric or cordless drill with a 1/4″ nut driver or a slotted screwdriver bit
- 3/32″ drill bit
- A pencil
Here are some simple installation steps to follow:
- Position Headrail
Place blind centered in the window with the brackets and mark with a pencil on the top of the window sill on each side of the blinds headrail. Make sure that the distance from the edge of the headrail to the sides of the window sill are the same on both sides. - Installing the mounting brackets
Screw the mounting screws through the brackets into the top of the window sill rather than the side. Remember, there will be a slight gap between the edge of the bracket and the window sill. - Install blinds
Slide the blinds into the brackets and close the hinges. - Install the valance
Once the blinds are installed you can put the bracket on the blinds with the mounting clips provided. You may want to re-order a new valance to match the exact width of the window so there are no gaps on the sides of the valance.
How To Lower Stuck Blinds
Lowering Stuck Blinds
Occasionally blinds will not lower after shipment. This is due to the “Pawl” binding. To release the blinds tug the lift cords to the side pulling towards the center of the blinds. If this does not work, the pawl must be released, follow these easy steps.
- Remove the blinds by taking the headrail out of the brackets.
- Take a screw driver and press the pawl down in the track in which it travels.
- Insert the blinds back into the brackets and try lowering the blinds again with the lift cord.

How To Replace Blind Slats
Replacing Blind Slats
Instructions for replacing slat(s) of horizontal blinds:
- Remove the plugs located on the bottom side of the bottom rail to reveal the knotted lift cord.
- Undo the knot and pull the lift cord out from the front of the blind. Only pull out the lift cord through the routed holes in as many of the slats as necessary to release the slats you are removing.
- Replace desired slat(s).
- Restring the lift cord through each slat in the blind. Alternate the lift cord from left to right on each ladder rung as you work your way down the blind.
- Insert the lift cord through the bottom rail hole and tie a knot. Make sure that the lift cords are even and that the bottom rail hangs straight.
- Replace the bottom rail plugs back into the holes on the bottom of the bottom rail. Use a rubber mallet or hammer to keep from marking the plugs.


How To Replace A Blind Tilter
Replacing Blind Tilters
Instructions for replacing the blind tilt for horizontal blinds:
- Remove blinds from the window.

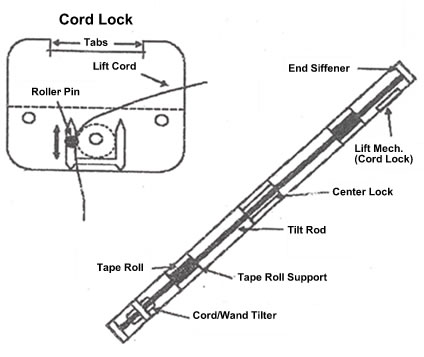
- Remove the end stiffener from the end of the headrail where the tilt mechanism is located.
- Slide the tilt rod out to free tilt mechanism.
- Snap-out the tilt mechanism.
- Replace the tilt mechanism with the new one. Make sure the new tilt mechanism is fully seated in the control route/punch of the headrail.
- Slide the tilt rod back in through the new tilt mechanism.
- Replace the end stiffener.
Troubleshooting
How To Troubleshoot Blind Tilter problems
Instructions for troubleshooting tilt problems for horizontal blinds:
- Confirm that the tilt rod goes through the tilter mechanism and has not slid out of place.
- Tilt rod should not be impeded from turning by the end stiffeners or the center lock. Tilt rod should be approximately 1-1/2″ less than the headrail size so it does not go under any part of the end lock. This may bind the tilt rod from turning.
- Make sure that the tilt rod is not bent.
- Confirm that the tilter mechanism is completely set into the headrail of the blinds.
- Make sure that the tape roll/drum is properly set in the tape roll support/cradle. The tape roll/drum must be centered in the tape roll support/cradle in order to turn freely.
- Placement of tape roll supports and tilter should allow the tilt rod to turn without tension. The tilt rod should not bend in order to insert into the tilter gear or to run through the tape roll supports.
- Attempt to spray the headrail components (including the tilter & tape rolls/drums) with a silicon spray. This may remedy abnormal stiffness and squeaking.
- If all of the above methods fail or when it is obvious that the gear in the tilter has worn out or is defective, replacing the tilter may be necessary.
How To Replace A Cord Lock
Replacing Cord Locks on Blinds and Shades
Mechanical parts wear over time and can break from use. If you need to replace the cord lock on your blinds or shades below is a list of easy steps to replace the cord lock.
- Remove the blind or shade from the window.
- Untie the draw cords. DO NOT cut the cord as it is measured for the length of the shade or blinds. Tip: Mark the position of the knot on the draw cords to help identify where you will retie the knot later.
- Pull the draw cords through the top of the cord lock mechanism.
- Pop the cord lock mechanism out of the blind or shade headrail.
- The new cord lock assembly should come completely assembled. If it does not, follow these simple steps
-
- Insert the pawl into the cord lock housing.
- Insert the pin into the cord lock housing.
- Insert the new cord lock into the blind or shade headrail. Press down unto the housing snaps into place. You should hear a click when it is in position.
- Thread the draw cords back through the new cord lock between the pin and pawl and through the headrail.
- Retie the knot in the draw cords on the mark previously placed on the cords.


How To Replace Lift Cords
Replacing Lift Cords
Constant pulling up and down of a blind will produce friction. Friction causes heat. Heat causes weakness of some materials. Weakness in small objects cause breakage. Accidents happen. Dogs happen. You name it, it happens. But all is not lost believe it or not, this type of repair is actually simple. Follow along…
The best part of this repair procedure is that the blind is not removed from the window. Pretty cool, huh? Okay.
But, first things first…
- To order replacement cord, please Contact Us. You will need to provide as much information as you can on the blind or shade you are working on. Often there will be a part number or some kind of information inside of the headrail.
- Don’t start pulling the broken cord or tassels yet. Take hold of the broken end of the cord that travels up into the headrail. Clip any excess fray from the end of the cord.
- With the replacement cord in hand, take one end and attach it to the broken end of the cord. How do you do that, you ask? There are two different ways to do this. One is to butt each end together and use a tiny bit of masking tape to join the two. The other way is a little more tricky but ingenious especially when there isn’t tape available. Butt the two ends together with one hand and use your free hand to strike a lighter. Carefully touch the flame to the two ends until you see a melting action begin. Douse the flame and quickly and carefully roll the two ends back and forth together thus melding the two ends. This trick may take you a few tries, but it does work.
- With the two ends joined, you can now pull on the corresponding cord that comes out of the headrail at the cord separator until you see the splice (tape or melt).
- Remove the bottomrail plug.
- Repeat step 3.
- Pull the knotted end of the cord that is under the bottomrail plug away from the bottomrail thus pulling the replacement cord through the ladder and through the bottomrail.
- Knot the end of the cord and tuck into the bottomrail along with the ladder ends. Replace bottomrail plug.
- At the headrail, pull replacement cord taut enough to pull any slack from the ladder area. Measure where the tassel will go (even with the other tassel – or even with the other cords if joined together at a joiner ball). Knot cord.
Troubleshooting
Troubleshoot Lift Problems with Blinds or Shades
The Cord Lock Mechanism is a snap-in part. The mechanism may be defective if the roller pin is prevented from moving freely.
- Make sure the blinds lift cord runs straight up into the cord lock mechanism with no obstructions or diversion. The lift cord should not be twisted
- When the blind is lowered, the roller pin should be loose to the touch.
- The roller pin must be able to move freely up and down on the truck.
- Make sure that the lift cord is not caught between the lift cord mechanism and the headrail when the lift cord mechanism is snapped into the control route/punch in the headrail.
- Small blinds (less than 20-1/8″ net width) and blinds with same-side controls have a tape roll support near the cord lock mechanism. This closeness may create tension on the lift cord if the lift cord rubs against the tape roll support
- The curved tabs that secure the cord lock mechanism under the lip of the headrail can sometimes become bent after use. To create a more firm hold: remove the cord lock, bend the tabs upward, and replace the cord lock
How To Shorten Blinds
Shortening Blinds
Instructions for removing the bottom slat(s) to shorten the length of horizontal window blinds:
- Remove the plugs located on the bottom side of the bottom rail to release the string ladders and the knotted lift cord.
- Undo the knot in the lift cord and pull up the lift cord enough to release the slats you need to remove.
- Remove the bottom rail and the slat(s) necessary to shorten the blind to the desired length.
- Insert the bottom rail back into the ladder rung where you removed the top slat.
- Cut the string ladder above the rung that hangs below the bottom rail. Be sure that you have enough ladder hanging below the bottom rail to insert these strings into the holes on the bottom of the bottom rail.
- Insert each of the lift cords through the bottom rail hole and tie a knot. Make sure that the lift cords are even and that the bottom rail hangs straight. You may have to adjust the position of the knot to achieve the desired length to your blinds. Do not try to adjust the length by pulling on the lift cord.
- Replace the bottom rail plugs back into the holes on the bottom of the bottom rail. Use a rubber mallet or hammer to keep from marking the plugs.


Uneven Roller Shades
Fixing Roller Shades that do not roll up evenly
Not rolling up evenly is the most common problem with any type of roller shade. Telescoping is when the shade gathers to one side or the other as it is rolled up. This is typically a leveling problem, however; you do not have to remove the shade to fix it. Solution:
- First check the mounting brackets to ensure that they are aligned and level. Ensure that the roller barrel is level. Please use a leveling device.
If the shade is leveled then there is one more thing you can do to prevent the shade from rolling up unevenly
- Some fabrics have a tendency to telescope to one side or the other when being rolled up. To remedy this, unroll the shade until you can see where the fabric is attached to the roller. Place a small piece of masking tape at the attachment on the opposite side end from where the shade is telescoping. A second or even third piece can be placed on to fix more extreme telescoping problems.

How To Upgrade To A Cord Tilt
Upgrading to a Cord Tilt
If you are wanting to change your window blinds from a wand tilt to a cord tilt, you may find it’s easier than you think.
- Remove the blinds from their brackets and remove the end caps.
- Slide the rod out of the wand tilt mechanism.
- Remove the wand tilt mechanism completely.
- Slide the new tilt mechanism cord through the hole.
- Secure tassels with a small knot in the cord.
- Slide the rod through the new tilt mechanism.
- Replace end caps.
- Re-install blinds on your windows.
How To Upgrade To Wand Tilt
Upgrading to Wand Tilt
Instead of using a cord to tilt the slats on your window blinds, you can simply make it a wand tilt instead. Just follow these easy steps.
- Remove the blinds from the window and remove end caps so you can access the tilt mechanism.
- Slide the rod away from the cord tilt mechanism.
- Remove the cord tilt mechanism by first removing the tassel and pulling the cord out through the hole.
- Insert the wand tilt where the cord tilt used to be.
- Slide the rod back through the hole in the tilting mechanism.
- Replace end caps and reinstall your blinds.
How To Fix Coning and Scewing
Tip for Fixing Sheer Horizontal Shades
This is when the shade is rolling up to one side or the other.
On occasion a shade will hit an obstacle on the way up and cause the shade to tighten on one side.
Solution: Raise and lower the shade completely to lowest position. Give slight tug on that side with hands and raise again. If problems persists move bottom weight system in the bottom rail by turning the bottom rail screws to adjust the weight to that size. In some cases Sheer Horizontal Shades have been stood on end causing roll up to one side. Shades should be laid flat.
Solution:
-
- In time, fabric will relax and allow to open more freely.
- With the blind in the down position with vanes open. Roll fabric onto Bottom rail rolling towards you, roll all the way up gently apply tension on the back.
- The occasional application of a static spray may be needed. Static electricity can cause the vanes to become stuck in the closed position.
Cordless One Control Operation
Adjustments and Operations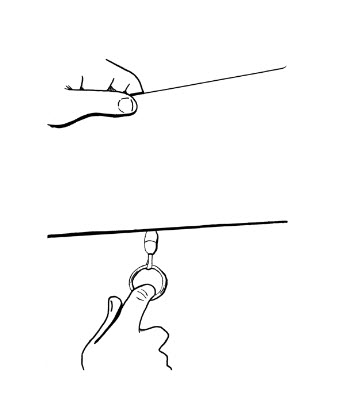
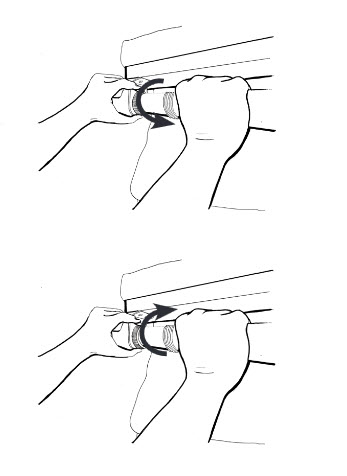 adjusting a Waterfall shade, work from the BACK of the shade.
Grasp the tube with the right hand making sure it does not rotate. With your left hand, turn the white ribbed wheel in the direction of the arrow (shown in Figure A) one full turn. Test the shade-repeat if necessary.
Grasp the tube with right hand and rotate 1/4 turn in the direction of the arrow (shown in Figure B) to unlock the spring. With your left hand, turn the white ribbed wheel one full turn in the same direction. Test the shade-repeat if necessary.
to the correct position. If additional adjustment is needed, turn the ribbed wheel an additional 1/8 of a turn.
